Integrate Google Universal Analytics using GTM
Important
Google Analytics 4 (GA4) will replace Google Universal Analytics (UA) starting in 2023. For information on setting up an integration between GA4 and Optimizely Web Experimentation, see the following articles:
This topic describes how to:
- Get set up within Google Tag Manager to integrate Optimizely Web Experimentation and Google Universal Analytics
- Confirm that your integration is working properly
If you use Google Tag Manager, you may already have pre-configured Universal Analytics tags that fire off pageview calls and do not want to use a regular custom HTML tag. You can integrate Google UA with Optimizely with this one-time setup process.
Download a checklist to help you manage this procedure.
When to use this procedure
The most common reasons you might need to follow these steps are:
- If you are working with redirect experiments
- If you are using a dynamic tracker
Note
See Standard Google Analytics integration or set up a Custom Analytics integration.
Before you start
You will need to create a Google UA custom dimension and a custom report.
One-time setup to integrate via Google Tag Manager
Option 1: Container Import in Google Tag Manager (recommended)
You can automate the setup by using GTM's Container Import functionality. Simply follow the instructions here to get your integration up and running in just a few minutes without risking any user errors.
Option 2: Manual setup
To use GTM to integrate Optimizely Web Experimentation and Google UA:
-
In Google Tag Manager, go to Workspace > Variables.
-
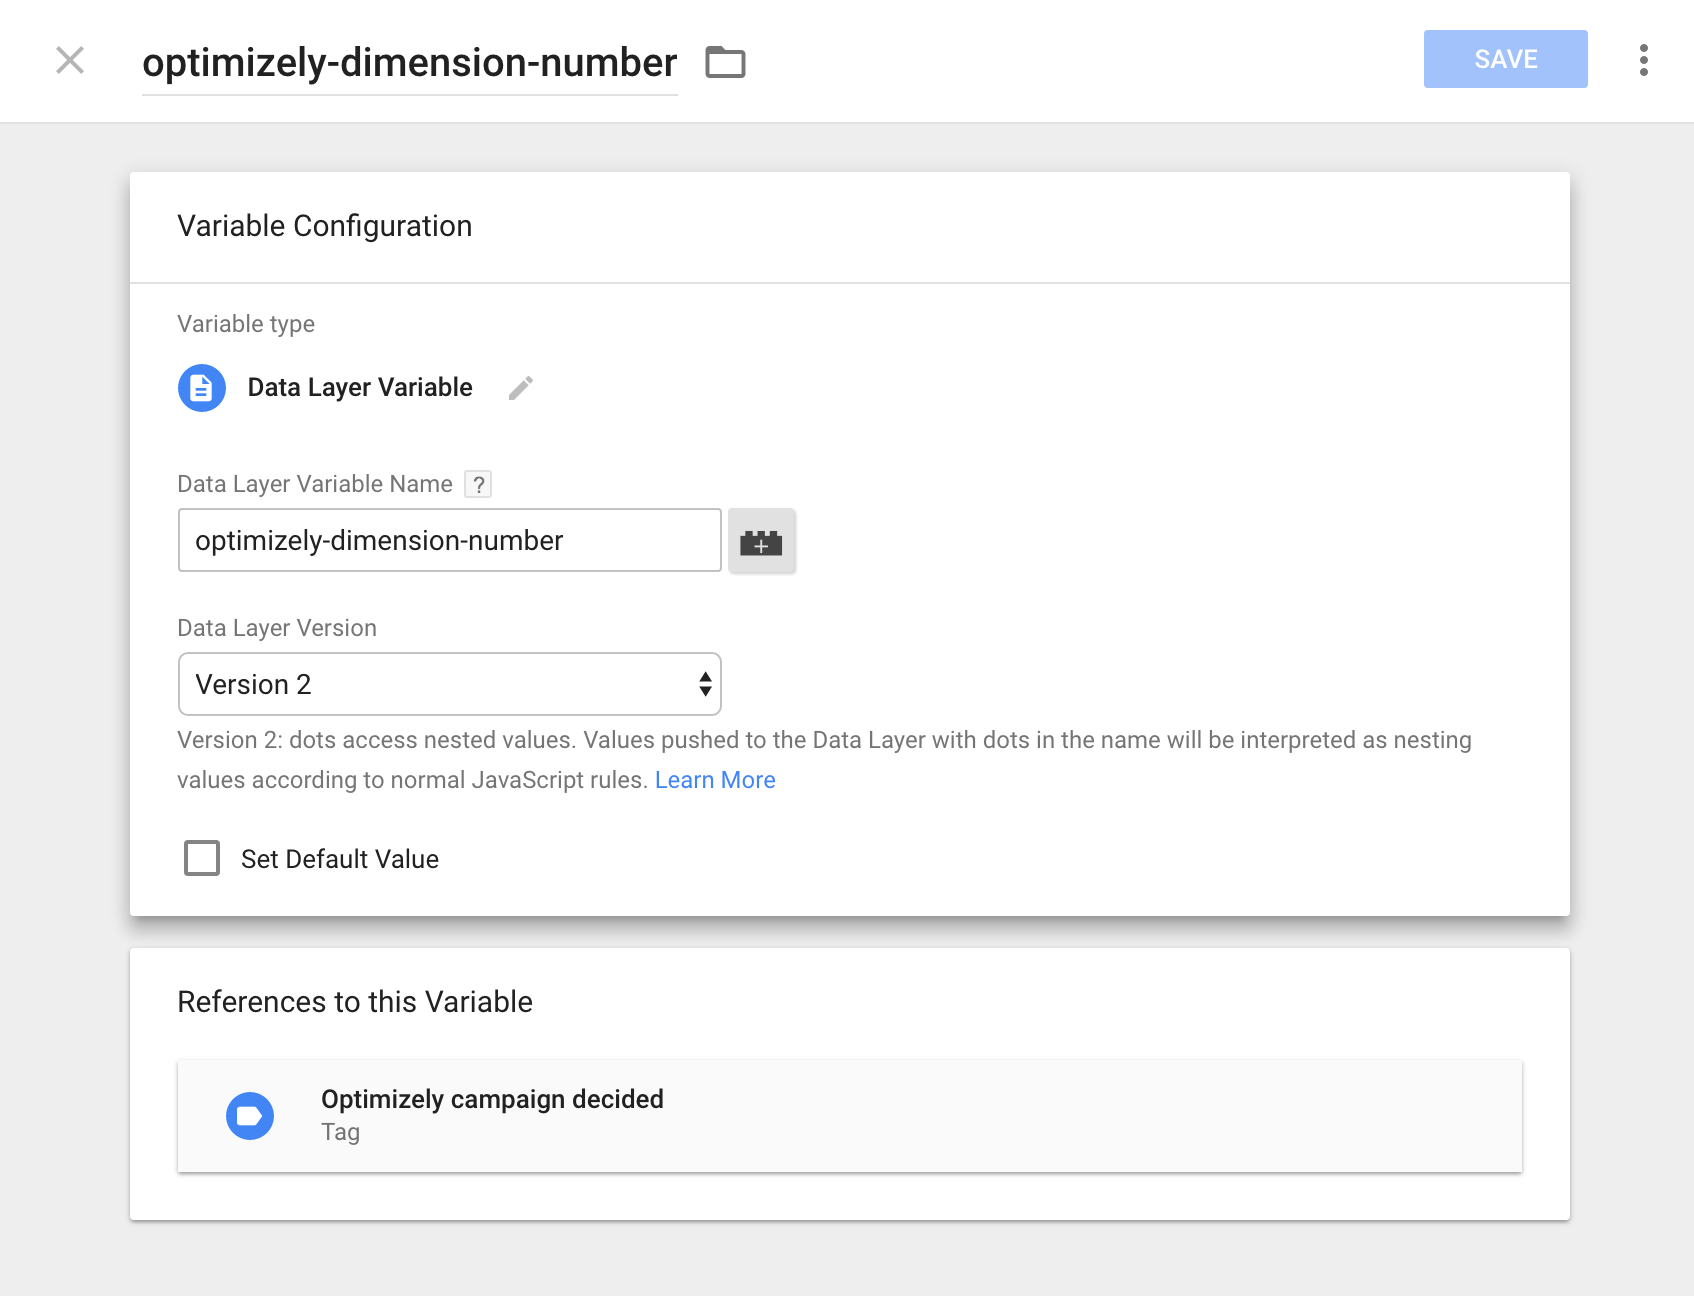
Create a new User-Defined Variable called
optimizely-dimension-number.- In the Type field, choose Data Layer Variable type
optimizely-dimension-number. - Then, in the Data Layer Version field, choose Version 2.

- In the Type field, choose Data Layer Variable type
-
Create a new User-Defined Variable named
optimizely-dimension-value- In the Type field, choose Data Layer Variable.
- In the Data Layer Variable Name field, type
optimizely-dimension-value - In the Data Layer Version field, choose Version 2.
-
Create a new User-Defined Variable named
optimizely-referrer.- In the Type field, choose Data Layer Variable.
- In the Data Layer Variable Name field, type
optimizely-referrer. - In the Data Layer Version field, choose Version 2
-
Go to Workplace > Triggers.
-
Create a new Custom Event named Optimizely Campaign Decided.
- In the Event name field, enter campaign-decided.
-
Create a new Custom Event named Optimizely Referrer Override.
- In the Event name field, enter optimizely-referrer-override.
-
Go to Workplace > Tags.
-
Create a new Custom HTML Tag named Optimizely Integration Code.
- Copy this tag configuration code and paste it into the HTML field.
- In the Triggering field, choose All Pages.
-
Create a new Google Universal Analytics Tag named "Optimizely Campaign Decided" to track events in UA.
-
Tag Type – Choose Universal Analytics**.**
-
Track Type – Enter Event**.**
-
Category – Enter Optimizely**.**
-
Action – Enter Assigned to Campaign.
-
Label – Blank. Not required according to Google Analytics' event tracking documentation.
-
Value – Blank. Not required according to Google Analytics' event tracking documentation.
-
Non-Interaction Hit – Set to True**.**
-
Google Analytics Settings – Select the Google Analytics variable that you want to integrate Optimizely with.
-
Enable overriding settings in this tag – Enable.
-
Click More Settings.
-
Click Custom Dimensions.
-
Under Custom Dimensions –
Set **Index** to {{optimizely-dimension-number}} Set **Value** to {{optimizely-dimension-value}} -
Triggering – Select Optimizely Campaign Decided.
-
Here is how the tag should appear. The name under Google Analytics Setting will be different than the one on the image because the name is user-defined.
-
-
Create a new Google Universal Analytics Tag named Optimizely Referrer Override to track events in UA. This field is only for redirects.
-
Tag Type – Select Universal Analytics.
-
Track Type – Select Event**.**
-
Category – Enter Optimizely.
-
Action – Enter Redirect Referrer Override.
-
Label – Blank. Not required.
-
Value – Blank. Not required.
-
Google Analytics Settings – Select the Google Analytics variable that you want to integrate Optimizely with.
-
Enable overriding settings in this tag – Enable.
-
Non-Interaction Hit – Set to True.
-
Fields to Set –
Set **Field Name** to **referrer** Set **Value** to {{optimizely-referrer}} -
Triggering – Select Optimizely Referrer Override.
-
Tag configuration
Copy this code exactly as-is into the custom HTML section described here. For the following code to work, the Optimizely Web Experimentation object needs to be available by the time it runs - make sure to load the Optimizely snippet before the tag with the following code.
<script>
var DATALAYER_OBJECT_NAME = 'dataLayer';

/**
* Some analytics platforms have the ability to fix referrer values by overriding the page referrer value.
* this function is called when a redirect has occured on the previous page.
*
* @param {string} referrer - The effective referrer value
*/
var referrerOverride = function(referrer) {
    var dataLayerObject = window[DATALAYER_OBJECT_NAME] || [];
    dataLayerObject.push({
      'event': 'optimizely-referrer-override',
      'optimizely-referrer': referrer
    });
};

/**
* Used for experiments created in Optimizely. This function is executed for all
* experiments that are running on the page. Use the arguments to send data to your platform.
*
* @param {string} campaignId - The ID of a campaign that is running on the page
* @param {string} integrationString - Integration string for a particular campaign
*   which is a sample of the visitor that isn't exposed so that Optimizely can calculate the impact of a campaign.
*/
var sendCampaignData = function(campaignId, integrationString) {
  var dimension = optimizely.get('data') && optimizely.get('data').campaigns[campaignId] && optimizely.get('data').campaigns[campaignId].integrationSettings && optimizely.get('data').campaigns[campaignId].integrationSettings.google_universal_analytics && optimizely.get('data').campaigns[campaignId].integrationSettings.google_universal_analytics.universal_analytics_slot;
  if (dimension) {
    var customVariableValue = integrationString;
    var dataLayerObject = window[DATALAYER_OBJECT_NAME] || [];
    dataLayerObject.push({
      'event': 'campaign-decided',
      'optimizely-dimension-value': customVariableValue,
      'optimizely-dimension-number': dimension
    });
  }
};

/**
* This function fetches the campaign integration string from the Optimizely client
* and calls the functions provided in the arguments with the data that needs to
* be used for sending information. It is recommended to leave this function as is
* and to create your own implementation of the functions referrerOverride and
* sendCampaignData.
*
* @param {Function} referrerOverride - This function is called if the effective referrer value differs from
*   the current document.referrer value. The only argument provided is the effective referrer value.
* @param {Function} sendCampaignData - This function is called for every running campaign on the page.
*   The function is called with all the relevant ids and names.
*/
var initNewOptimizelyIntegration = function(referrerOverride, sendCampaignData) {
  // There can only be one effective referrer on a page. This boolean makes sure the
  // redirect overwrite only happens once. Multiple referrerOverwrites might result in undesired behavior.
  var referrerOverwritten = false;
  var newActiveCampaign = function(id) {
    var state = window['optimizely'].get && window['optimizely'].get('state');
    var referrer = state.getRedirectInfo() && state.getRedirectInfo().referrer;
    if (!referrerOverwritten && referrer) {
      referrerOverride(referrer);
      referrerOverwritten = true;
    }

    var campaignId = id;
    var integrationString = state.getDecisionString({'campaignId':campaignId});

    sendCampaignData(campaignId, integrationString);
  };

  /**
   * At any moment, a new campaign can be activated (manual or conditional activation).
   * This function registers a listener that listens to newly activated campaigns and
   * handles them.
   */
  var registerFutureActiveCampaigns = function() {
    window.optimizely = window.optimizely || [];
    window.optimizely.push({
      type: 'addListener',
      filter: {
        type: 'lifecycle',
        name: 'campaignDecided'
      },
      handler: function(event) {
        var id = event.data.campaign.id;
        newActiveCampaign(id);
      }
    });
  };

  /**
   * If this code is running after Optimizely on the page, there might already be
   * some campaigns active. This function makes sure all those campaigns are
   * handled.
   */
  var registerCurrentlyActiveCampaigns = function(){
    var state = window['optimizely'] && window['optimizely'].get && window['optimizely'].get('state');
    if (state) {
      var activeCampaigns = state.getCampaignStates({
        isActive: true
      });
      for (var id in activeCampaigns) {
        newActiveCampaign(id);
      }
    }
  };

  registerCurrentlyActiveCampaigns();
  registerFutureActiveCampaigns();
};

/**
* A wrapper around the logic for the new Optimizely integration.
* @param {Function} referrerOverride - This function is called if the effective referrer value differs from
*   the current document.referrer value. The only argument provided is the effective referrer value.
* @param {Function} sendCampaignData - This function is called for every running campaign on the page.
*   The function is called with all the relevant ids and names.
*/
var initOptimizelyIntegration = function(referrerOverride, sendCampaignData) {
  initNewOptimizelyIntegration(referrerOverride, sendCampaignData);
}

initOptimizelyIntegration(referrerOverride, sendCampaignData);
</script>
Confirm your integration setup
After completing your integration, test it:
- Create a new campaign/experiment to integrate with Google UA.
- Turn on UA integration for the campaign/experiment.
- Set the custom dimension where Optimizely Web Experimentation should send data.
- Run the campaign/experiment.
- Open the Network panel in your browser.
- Go to the page where the campaign/experiment is running.
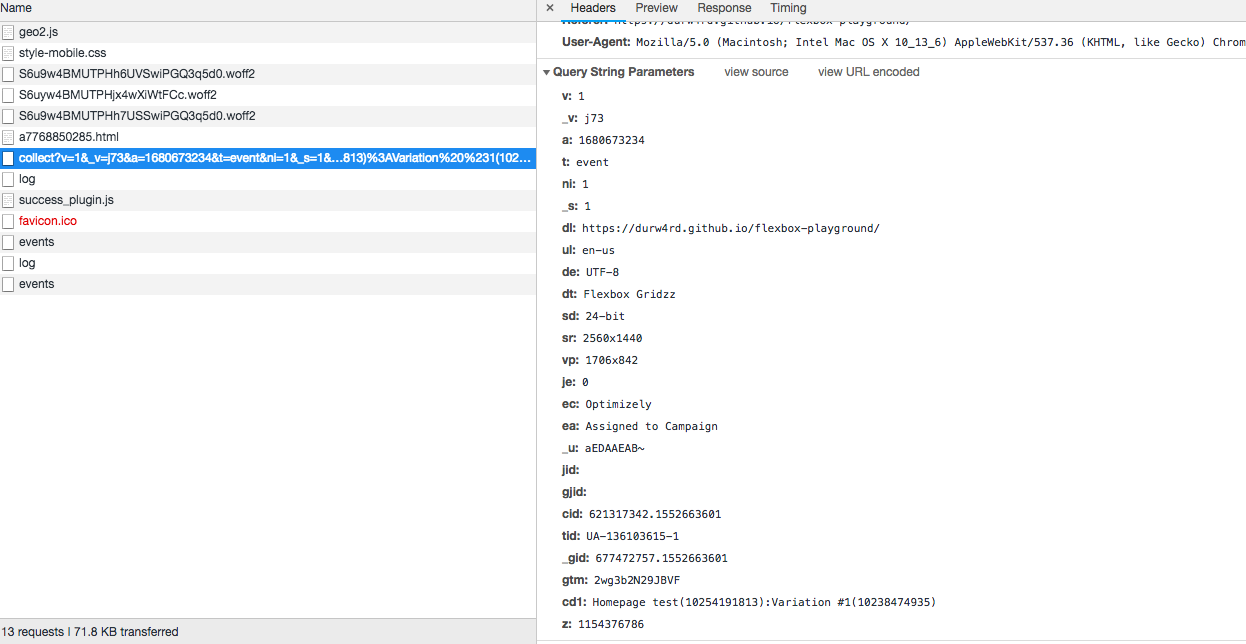
- Filter for “collect” to only show UA requests.
- Look in the Headers section of each request for the
cd{X}value.
If the integration works properly, you see the output in the Headers section for each request with the cd{X} value ({X} is the dimension number you set in step 3). See Naming conventions for third-party integrations.

Updated almost 2 years ago